
FuguHub
Manage Data Your Way
FuguHub for the My Book Live NAS
My Book Live is a relatively inexpensive Network Attached Storage (NAS) device from Western Digital. My Book Live is powered by Linux and anyone with some Linux experience can install additional applications for this device.
The FuguHub My Book Live edition is designed exclusively for this device and will not operate on any other My Book devices such as My Book World Edition. You must have some Linux experience and command line experience when installing the FuguHub My Book Live edition on this device.
This tutorial is divided into the following sections: how to prepare the device, how to install FuguHub, how to perform firmware upgrades after installing FuguHub, and how FuguHub is integrated with the existing User Interface already running on the device.
Preparing the My Book Live for FuguHub installation
|
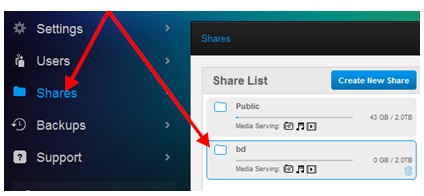
Important: Make sure your device runs the latest firmware and then disable automatic firmware upgrades, if enabled.Note: it is very important that you make sure the firmware is not upgraded automatically. The FuguHub installation script requires that you have created the user "bd". You can create additional NAS users by navigating to your device using a browser. Creating a new user is explained in the My Book Live User Manual. |
The latest firmware version requires that you also create the share 'bd'. |
 |
- Enable SSH on the device by navigating to http://mybooklive/UI/ssh (case sensitive). If the name "mybooklive" is not working, use the device's IP address.
- Remote into the device by using an SSH client. Windows users can download the free PuTTY SSH client. Enter mybooklive as the SSH "Host Name" or enter the device's IP address.
You should see: login as: - Enter the user root and the password welc0me.
How to Install FuguHub
- Make sure you have created the user "bd" as explained above. The FuguHub server will be installed into this user's directory and the server will also run as this user.
- Copy and paste the following into the SSH client window:
wget FuguHub.com/releases/mybook/install.sh;chmod +x install.sh;./install.shThe above is a concatenation of three commands which downloads the installation script, makes the script executable, and then executes the script. The FuguHub server will be running after the installation completes. The server will also start automatically when you power on the device.
We recommend that you clear your browser cache before navigating to your FuguHub powered My Book Live.
Use a browser and navigate to your FuguHub server running on the My Book Live. Carefully read the instructions and click the "Config-Wizard" link shown in the left menu. This link takes you to the FuguHub configuration wizard and Internet wizard. You cannot login before you have configured your FuguHub server.
How to perform Firmware Upgrades
If a new firmware version becomes available after you have installed FuguHub and you wish to install the new firmware, then follow these instructions:
- Login to your device using SSH
- Copy and paste the following into the SSH client window:
wget FuguHub.com/releases/mybook/disable.sh;chmod +x disable.sh;./disable.shThe above three commands downloads and executes the FuguHub disable script which reverts back to the original UI without deleting the FuguHub installation.
- Perform the firmware upgrade
- Login to your device using SSH
- Copy and paste the following into the SSH client window:
wget FuguHub.com/releases/mybook/enable.sh;chmod +x enable.sh;./enable.shThe above three commands downloads and executes the FuguHub enable script which re-enables the FuguHub server.
FuguHub's integration with the existing UI
The My Book Live's web based management user interface (UI) is found under the URL http://mybooklive/UI/
The My Book Live's web based UI is powered by the Apache web server and PHP. The UI is designed such that it can only operate on port 80. FuguHub also requires that the server is listening on port 80 and 443 for secure connections. This creates a conflict since only one server can use port 80.
The way this is solved and handled by the installation script is to reconfigure Apache to only listen on the loopback adapter, i.e., only listen for connections on localhost. The FuguHub server is configured to listen on the physical network adapter. This solution makes it possible to operate the original Apache powered UI and FuguHub on the same port number.
FuguHub includes a reverse proxy and the FuguHub My Book Live edition includes an auxiliary FuguHub application that sets up a reverse proxy that enables you to access the original UI via FuguHub. This auxiliary FuguHub application also enables authentication of the original /UI/ URL. Accessing the original /UI/ becomes possible as soon as you authenticate with the FuguHub server. You can also access the /UI/ URL by using HTTPS (secure connection).
|
|
|
This web site is powered by the FuguHub Web/Application Server.
© 2022 Real Time Logic LLC, California, USA. All rights reserved.
Powered by the Barracuda Embedded Web Server and the SharkSSL Embedded SSL Stack.